Tuesday, July 21, 2015

Getting to Yakushima

This topic has been done by many others, so I hope you'll forgive me for leaving out the details.
Basically, there are four ways you can get to Yakushima using public transportation.

1. Fly with JAL Commuter Service.
http://www.jal.co.jp/en/
Expensive, but fast and sometimes more reliable than sea travel.
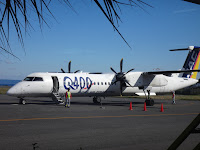
Direct flights are offered daily to/from Osaka, Fukuoka, and Kagoshima. Folks flying from Tokyo can transfer in Kagoshima. Book 75 days in advance or look for campaign discounts for savings of over 50%. Transfers in Kagoshima are fairly hassle-free, and the Yakushima Airport is so tiny it feels more like a bus station. Most likely you'll fly on a DC8-Q400, which is a 74-seat prop plane that feels a lot smaller than it is. Although the planes are pretty reliable in rain and moderate wind, they cannot land in Yakushima if there is too much fog. (And you can't leave Yakushima until the plane you want to board lands!)

2. Skim across the water on a Toppy high-speed ferry (jetfoil).
https://www.tykousoku.jp/fare_time/kagoshima_yakushima.html
See my post about Jetfoils!
Not as expensive as flying, and slightly more flexible.
As of writing, seats cost 16100 yen round-trip. Note that the schedule changes with the season, but the ride usually takes around two hours. Boats go to both the communities of Miyanoura and Anbo. You can also do a day-trip to the neighboring island of Tanegashima. The website is currently in Japanese, but try this link: http://www.yakushimatravel.com/ticket-english.html .Unfortunately, I cannot do it for you at this time unless you are booking a hike with me, but I do hope to offer this service, soon!

As a bonus, sometimes you can see flying fish if you crane your neck towards the rear of the craft. Because the jetfoil can travel straighter than the contour of the waves, you probably won't feel seasick unless the waves are several meters tall.

3. Stretch out on the Yakushima2 Ferry.
http://ferryyakusima2.com/
Cheap, easy, relaxing, but slow and not so reliable.
It's cheap (8900 yen as of writing), you don't (usually) need a reservation, and you can take lots of luggage, but the schedule doesn't fit everyone's needs, and the boat doesn't always run. The boat departs from Kagoshima at 8:30am and gets in to Miyanoura at 12:30. Then it departs again for Kagoshima at 13:30 and gets in around 17:40. The boat may be delayed or canceled in strong wind or waves. Sometimes it is docked for repairs for several days, so check the website.

You can relax in the lounge, order noodles, watch for flying fish from the deck, or even take a shower if you need to.

4. Travel like freight on the Ferry Hibiscus.
http://www.yakushimaferry.com/
Dirt cheap, but it takes a long time, and it feels in no way like a passenger vessel.
First, you'll need to take a train to Saka no Ue Station and catch a taxi from the cab company next door to the station. There's a sign for the bus stop, but I don't see any sign of a bus. Also, bring food and bedding if you need it because the boat departs at 18:00 and gets in to Yakushima at 7am the next morning. You'll have some carpeted floor space to sit on in a room with a television, blankets, and mini-pillows, but that's all. From Yakushima it leaves at 8:20 and gets into the port near Kagoshima at 14:40. (You'll want to call a cab from there.) Cost is 3600 yen each way at time of writing. Keep in mind this is mostly a freight ferry, and it feels like it.


Perhaps even more importantly than getting to Yakushima, is leaving from Yakushima. Please keep in mind that flights and boats may be delayed or canceled due to weather. I strongly advise that you keep a buffer of several days before travelling internationally after you leave Yakushima. Also, if you go scuba-diving, you'll want to keep that in mind when booking flights, too.

Pack List for Day Hikers

Much of this is going to seem pretty obvious to experienced hikers, but there's a few things you may have overlooked if this is your first time in Yakushima. 

Pack Essentials
Backpack: A rain-cover highly recommended, but don't expect the rain-cover to keep your pack dry if it rains sufficiently; instead, take plastic or ziploc bags for your valuables. You can use a garbage bag as a cheap pack-liner.

Breakfast & Lunch: Depending on where you are staying, you can order a boxed breakfast and boxed lunch (called a bento) the evening before the hike and pick it up before you board the bus. Ask at your accommodation. Note that there are no trash-bins at the trail heads nor along the trails.

Disposable Toilet Pack & Toilet Paper: Can't go five hours without a toilet? Then you probably want to invest 250 to 500 on a toilet pack to use at a booth in the mountains as well as some toilet paper, but remember that you'll have to carry the contents back to the trail head with you. Disposable toilet packs are also highly recommended for crowded days and for folks going on two-day hikes. The nicest disposable toilet booth on this trail is shortly after Daio-Sugi (大王杉), before entering the World Heritage Site. There is no toilet booth at Jomon Sugi.

Map: You can get a black-and-white printout of the trail from an information booth. Especially if you are not hiring a guide, please bring a map!

Water Bottle: 500ml~1L is fine for most day hikes, but you may need more if you sweat a lot or if the weather has been dry. You can fill up just about anywhere the water looks clean. I don't recommend drinking the water immediately below a mountain hut, bathroom, in front of Wilson's Stump (because there used to be a toilet-pit nearby), or at lower elevations around towns. No filters or tablets necessary.

Watch: Watch your time. For Jomon Sugi hikers, plan to reach the end of the train tracks by 10am at the latest and note any bus connections you need to make at the end of the hike.

Headlamp: In the summer months, it may be fine to leave the trail head at daybreak, but if for some reason your return is delayed, you don't want to be walking back in the dark.

Optional/Seasonal:
Light spikes and eizen: If the forecasted low is below 8 degrees, there's a good chance of encountering ice. Light, slip-on spikes work great on the railroad tracks heading towards Jomon Sugi, while light-eizen are advisable for snowy conditions. If you hire a guide, usually he/she will have these for you.

Hiking poles: Poles can be a hindrance if you're not used to using them. If you are young and do not have knee problems, I think it's easiest to have both hands free to grab tree roots and trunks on most trails. However, poles can be quite useful when there's snow on the trail, and they can take a lot of pressure off your knees if used properly. Please put rubber caps on your poles to preserve the trail.
 
Umbrella: Use of an umbrella is not advised while hiking. However, some people do use umbrellas while walking the train tracks from the Arakawa Trail Head towards Jomon Sugi. Please be aware that the tracks can get slippery, and, please, don't use it while crossing bridges! It is nice to have an umbrella for lunch and break times, and in case you have to stop along the trail.

Sunscreen & Sunglasses: Most people are fine without sunscreen for forest hikes such as Jomon Sugi or Shiratani Unsuikyo trails. However, if you are hiking in the interior mountains, you may need these.

Bug Repellant: Especially for hiking above 500m altitude, I don't think you need it. Sometimes there are bugs around toilet areas, horseflies in summer months, and there can be quite a few leeches on minor trails, but I recommend avoiding these areas if you can't tolerate the bugs.

Trash Bag: Use it as a pack-liner, or use it as gloves if someone should injure themselves and start bleeding. Finally, use it to carry out your trash.

Camera: Bring a plastic bag or ziploc just in case. If it's raining, consider taking pictures on your way back from Jomon Sugi. I've seen cameras stop working after several hours of mist. (Even waterproof cameras can be affected by humidity.)

Cell Phone: Just like the camera, safeguard your cell phone from rain. You may get a clear signal around mountain tops, between the Jomon Sugi observation deck and Takatsuka Hut, and a couple other places along the trail. But otherwise you may want to turn it off or set it to "air-plane mode" to protect it and keep the battery from draining as it searches for a signal.

Winter Gear: An axe and other preparations are advised for hikers above the tree-line in the winter, but I do not take hikers when I believe conditions may be dangerous. I've never heard a a successful snowshoeing expedition in Yakushima. Be aware that in such conditions the road to the trail head may freeze.

Clothes
Rain Gear: Think 6-10 meters of rain in a year and 100% humidity. This trail is pretty hike-able in all but the worst conditions, but weather changes fast here, and the weather forecast for Yakushima is not intended to cover the mountain trails. If the a good storm catches you in a garbage-bag poncho, you may feel like garbage. Beware of "water-resistant" clothing, which is not intended for ten hours of rain, or one hour with over ten centimeters! Also, if you are hiking with others, realize that you may have to wait in the rain for others in your group.

Breathable waterproofs like Goretex are highly recommended. If you don't have both pants and a jacket, stop by a rental shop the afternoon before your hike, and pick up a set for 1,000 yen.

Hiking Boots/Shoes: Flip flops seldom last the whole way, and they're no good with nail heads and mud. Waterproof hiking boots or grippy trail runners are great. Sneakers are okay but slippery. Expect your shoes to get muddy. No matter what you wear, if there's enough rain, it's going to end up inside your shoes.

Pants: I know everyone loves their jeans, but soggy jeans are not fun. (If you're planning a backpacking tour of Japan, I suggest a pair of fast-drying synthetic pants that take up half the volume and weight as a pair of jeans, and if you wash them at night, they'll be dry (or nearly dry) in the morning.)

Shirt: Synthetics dry faster than cotton.

Extra Clothes: Essential in cooler months, an extra fleece or a change of clothes is also nice for the ride back after a rainy hike.

Optional/Seasonal:
Gloves: Don't expect them to keep your hands dry, but many folks hike with gloves for comfort and/or warmth.

Hat: To keep the rain out of your eye, and also to keep warm in cooler months.

Safety
First Aid Kit: Everyone has their own style. Bandaids, gauze, medications, and tape are a good place to start.  If you hire a guide, of course, your guide should be carrying a kit.

Whistle:
Especially if you are hiking on your own.

Optional:
Compass: If you get lost, I recommend staying where you are (or going uphill to try and make cell phone contact in some cases) and blowing your whistle, but there are often stories of folks who bump their heads, get turned around, and head the wrong way, or just make a Marker Tape:wrong turn at the trail head.

Marker Tape: This is for emergencies only. If you get lost and resort to using marker tape, please tell someone so that it can be removed lest others follow your mistaken footsteps.
Sunday, July 12, 2015

Craft your own Yakusugi Chopsticks

These days, it's hard to find a restaurant that does not use disposable chopsticks, but how making a pair that could outlast you? It's the perfect Japanese gift with a personal touch, it doesn't require a lot of time and money, and there are several studios around the island set up for guests to make chopsticks. Crafting a set of chopsticks will also give you a bit of incite into the properties of the Yakusugi wood. Oh, and you can do it even in bad weather.

Of course, if you don't have time to make your own, you can always buy a set. either way, you'll probably want to keep in mind two things:

1. Practicality
Yakusugi wood (and Japanese cedar wood, in general) is not hard like ebony, but rather flexible, and the chopsticks should be quite strong and durable so long as the grain runs the length of the stick. In fact, Sugi no Ya displays unusual chopsticks that have been purposely crafted to match the curve of the wood, each chopstick fitting perfectly against its partner. Because a craftsman's hands will tend to naturally follow the grain of wood, hand-crafted chopsticksweather straight or curvedare more valuable than bulk-machined chopsticks. It probably goes without saying that, although burly wood with gnarled, twisted grain is highly prized in artistic pie

Chopsticks of varying prices.
The set on the left has the
most expensive price tag.
2. Aesthetics
Yakusugi is known for very fine grain, and basic chopsticks are priced according to how well they show off this grain. For chopsticks with a square cross-section, finely grained wood can be cut at an angle so that the grain is visible on all four sides of the stick. Some people also favor wood that is ripply or dark with oil, or otherwise unique.

This spring, I watched two chopstick-crafting sessions, one at Takeda Sangyou, and one conducted by Mr. Sennin of Sugi no Ya. The methodology and final products could not have been more different.

Takeda Sangyou
At Takeda Sangyou, participants start with two perfectly-cut blocks of wood with beautifully fine, straight grain. Three grades of sandpaper are used to shape and polish the blocks into chopsticks that look just like the ones sold in the gift shop. This is a task that doesn't require more physical prowess, and there's not a whole lot that can go wrong. The chopsticks are then dipped in fixative, blow dried, and packaged, just like the ones in the store. If you like neatness and precision and you want a gift that is easily appreciated, or you're afraid of a chisel, I recommend Takeda Sangyou.

**Update: Takeda Sangyou has replaced chopstick-making with hand-polishing of premium pieces of Yakusugi wood, so that you take something home that is more like a gemstone than a stick. You can still see the factory, but the polishing is done in the relaxed setting of an indoor annex.

**Update: I plan to upload information on the Higashigawa workshop near Anbo soon.


Sennin-San
Participants in Mr. Sennin's workshop start with two blocks that have been hand-split. The grain may not be fine nor perfectly straight, but each set possesses a bit of individuality. Participants use a chisel--which takes a bit more finesse than sandpaper--to shape the chopsticks, and then buff the completed set with a brush-like tool made of reeds. If you're a fan of the "wabisabi" aesthetic or you want a bit more of a challenge, I recommend Mr. Sennin.


Caring for your chopsticks:
Care depends on how the chopsticks are finished. For example, because Yakusugi oil does not solidify, chopsticks that have not been fixed will need to be oiled every so often, so ask when you make or buy chopsticks.


There are several places around the island where you can make chopsticks. Most prefer that you call a day or more in advance and make a reservation.

Takeda Sangyou (武田産業)
Website: https://www.yakusugi-takeda.com/?mode=f4
Price: 2700+ yen depending on the wood
Time: Unlimited during business hours, reservation not required.
Location: Takeda Sangyou, Anbo 650-18 (30.3225,130.6569)


Sennin-san (仙人さん, workshops at two locations)
Website: http://suginoyas.com/hashi.html
Price: 1100 yen
Time: 40~50min.
Location: Senin Mura, Mianoura 2567-2 (30.4109,130.56752)
Session Times: 9:00am or 2:30pm
Location: Sugi no Ya, next to the airport (30.3822,130.6594)
Session Times: 10:30am, 1:30pm, or 16:00pm

*Times and prices subject to change. Please inquire at each location to make a reservation.

Friday, July 10, 2015

Mother-of-Pearl Accesories from WaRaku--and you can make one yourself, too!

Dr. Tagami said he spent
about two weeks on this
piece. Incredible!
The word Yakushima has been written with many different characters over the years; one of these "spellings" is 夜光島, with the characters for yakougai, the green turban shell known as a source of exquisite mother-of-pearl. I first ran across these characters shortly after arriving on the island, and I henceforth assumed that Yakushima had a long tradition of shell crafts. My assumption was further bolstered by an exhibit of finely carved mother-of-pearl figurines at last year's cultural festival. So the other day when I passed small flyer for carved mother-of-pearl accessories and a try-it-yourself workshop offered I decided to stop by and find out what this was all about. My assumptions, it turned out, were completely wrong. Mother-of-pearl crafting is just getting started in Yakushima!

Hard to forget seeing
something like this!
The address on the flyer was for Minshuku Waraku, (A minshuku is like a private inn, or a bed&breakfast, or a spare room that the owner rents out to guests.) which is just behind the new roast-beef lunch stand in Anbo. Waraku is a bit unusual because in addition to the owner's family and visiting guests, it also houses the owner's medical practice. Dr.  Tagami, it turns out, is a professional bone-setter.

Anyways, only when I pulled up to Waraku did I realize that the accommodation, the medical practice, and the mother-of-pearl accessories that I'd spotted in select  gift shops had anything to do with each other. After Dr. Tagami beckoned me out of the rain and into the foyer, I immediately spotted the figurines and carved shells from last year's cultural festival on the counter.

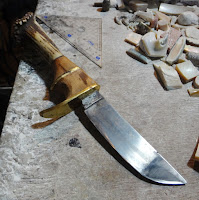
A hunting knife with a handle
fashioned from Yakusugi wood
and a Yakushika deer antler.
"Wait, are you the one who made these pieces?" I asked. I did a double-take when he said one of them would have taken about two weeks of spare time. I had assumed it would have taken years. He also explained that there really aren't many folks working with mother-of-pearl on the island. He was pretty much alone when he started dabbling in mother-of-pearl six or seven years ago. After his first piece, Dr. Tagami himself just kept receiving more large green turban shells and requests for various pieces, and so he just developed from there. What about the 夜光島 characters? It seems that there was a time when Yakushima was a major source of green turban shells for the Kinki region.


What about the tools? Do you need special tools for carving things like this?

He says the equipment is a lot like a dentist's drills, just less expensive. Would I like to see? He invites me to walk either through the doctor's office or around the veranda to his little workshop.

Clients often bring materials
available to them.
The workshop is chock-full of turban shells, abalone shells, coral, deer antlers and skulls, fragments of quartz and pieces of Yakusugi. There's an anvil and a DIY forge blocking the entrance, large fans, and sets of drills and bits and grinders and polishers, but indeed, nothing too high-tech. In fact, a pretty descent setup for mother-of-pearl work can be put together for under 50000 yen, he says. He explains that he's been experimenting with syntheses of different materials available in Yakushima and hopes to produce truly original goods.

His work is presently available in two shops: Honu (in Mugyo), and also in Hirauchi. (Oh dear, the name of the place has slipped my mind. I'll post it soon!) But he likes to take special requests, and he's excited when people come in to learn how to do it themselves.

I have to admit, I would never
have guessed he's a doctor,
until he started working!
Perfect. Because this is rainy season, and, believe it or not, I don't like hiking in the rain for days on end. Usually, he suggests that folks plan to spend several hours and go home with three pieces: First, he shows them how it's done from start-to-finish by creating a piece as they watch. (It's kind of hard to talk when you're working with the fan on.) Second, he cuts out a piece, and lets the client polish it. Third, the client creates a piece on their own.

He offers to show me and asks what shape I would like. Uh. . . how about a star? He searches around for an appropriate piece of shell and turns the fan on. Then the magic starts. He works quickly and methodically, exchanging drill bits and drills and polishers, and proving that the chaotic-looking workshop is in fact highly ordered. His hands do not shake or falter as his fingers work right next to the cutting edge. A few minutes later he has produced a highly polished star. 
Accessories made by Dr. Tagami. He made the star while I watched.

A simple piece like this, he explains, might sell for 500 yen in a shop, but he can't give a set price or time frame for clients without knowing what sort of pieces they hope to make. It's obvious he's not in this for the money, though. Anyways, the workshop is small, so only one person can work at a time, and he recommends that no more than two folks visit together.

Reservations are not necessary, but it's a good idea, because, of course, he has his other business, too. ^^

I was amazed by the precision and speed with which Dr. Tagami worked, and I'm excited to think up my own idea and try my own hand. Two words: DIY and creativity. Mother-of-pearl craft may not have a long history in Yakushima, but perhaps the tradition is just getting started.

Yakushima Minshuku WaRaku (屋久島民宿和楽)
Location: Anbo 739-146 (30.3262,130.6575)

Website: http://yakushimawaraku.web.fc2.com/yakushimazaiku.html